
I’ve been shooting for a long time now, but there are always some lighting setups that I’ve never gotten around to shooting. I’m sure we all have ideas for setups that may languish in an ‘inspiration folder’ somewhere on our hard drive, and this hanging lightbulb shot was certainly one of them for me.
There’s nothing too tricky about this shot, which is nice, but it did involve a little prep work as it requires a few unique items that I ultimately made myself to get the look I wanted. Again, this wasn’t too tricky, and you can do it fairly cheaply if you cut the occasional corner like I did.
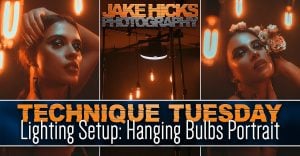
As always, let’s jump into the shot we’re looking to achieve, and then I’ll go over exactly how I achieved it and share some of the problems I encountered so you won’t have to. I’ll also do my best to provide alternative options for as many of the items used as I can. I know we’re in this transition period where many of us have moved on to LEDs, but a huge number of people are still using strobes, and I’ll do my best to offer solutions to those that are.
A selection of vintage-style bulbs
The Godox Spotlight as the hair-light
Rotolight AEOS 2 Pro is my key
Bring everything together with a forest of lightstands!!!!!
Suspend your lightbulbs around the subject
Place key light just out of shot in front of subject – set to 10,000K
Add hair light on the opposite side behind the subject – set to 2000K
Set the camera to ~5000K
Key-light – You can use whatever your preference for portrait key-light is here, but a beauty dish is ideal if you’re shooting with strobes, or like me, I simply used the diffusion dome on my Rotolight AEOS 2 Pro light ($3299) as it provides gorgeous soft light that is extremely controllable when brought in very close to the subject like this.
Hair-light – Again, you have plenty of scope to use what you’d normally use for a hair-light here. If you’re shooting with strobes, then an optical snoot will give a lot of fine control of exactly where the light will fall. Failing that, a gridded reflector dish or even barn doors on a reflector dish will work.
Dark Backdrop – I used a hand-painted backdrop here, but it turned out there wasn’t enough light in most of the images to actually see any texture on it. This was fine, and I didn’t want it to be distracting anyway. If you don’t have a hand-painted backdrop, any dark grey backdrop ($167) will be absolutely fine here, but I’d avoid black.
Assortment of Vintage-Stye Bulbs – These are the only somewhat unique items in this setup. I did end up making all of the hanging bulbs myself, and if I can do it, I assure you, you can do it, too. I’ll outline the DIY method I used below.
A Lot of Haze – This is somewhat optional, but I really recommend you try to add some atmosphere to your shot in some way. I used a smoke machine (AKA SmokeNINJA), but a normal smoke machine can also work. Alternatively, if smoke really isn’t an option for you, you can choose to use lens filters to get a very similar effect, and I’ll discuss those later on as well.
Camera – Nikon D850
Lens – I used a lot of lenses on this setup, but I recommend a longer lens like an 85mm or 105mm
Shutter Speed – 1/50th (I’ll explain why later on)
Aperture – f2.8
ISO – ~50
Kelvin – 5000K
Focal Length – 50 – 105mm
You should notice that a lot of these camera settings are all over the place, and that’s simply due to how much I was experimenting with when I was shooting with so many older, vintage-style lenses. That said, I have outlined the starting settings that I recommend you begin with.
Model: Lucia Kosta
Makeup: Tumsilt Makeup
Designer: Jolanta Pilinkaite Designs
DIY Hanging Bulbs
I think it’s safe to say that the hanging bulbs are the star of this particular show, but most of you won’t have a bunch of these vintage bulbs on strings (I’m resisting the urge to say ‘hanging about’ here). I was the same, so I looked at how to make them myself. Here are the steps I went through to make mine.
1. How many do I need? – I actually mocked up this lighting setup using the 3D studio tool Set.a.light3D (that produced the 3d render you just saw above), and from there, I was able to work out how many bulbs I would need to fill the frame with a certain about of depth in mind. I landed on seven bulbs, but seeing as one was often hidden behind the model, you could get away with six.
2. What should the bulbs look like? – This would seem obvious, but trust me, there are so many options when you search ‘vintage style bulbs. I got mine from eBay as they were the cheapest place I found with reasonable shipping times, but there were a couple of factors I wanted to consider when actually deciding.
Firstly, ‘cost’: I was buying seven of them, so I wanted to be sensible with the individual price.
Secondly, the size of them. I knew these bulbs were going to be ‘in-shot,’ so I didn’t want them to be tiny little fairly-light looking things. Alternatively, I knew they couldn’t be too big as I wanted the model amongst them.
Ultimately, I landed on the old ‘T10 E27 40W RC’. A real classic bulb, to be sure, and although I don’t need to explain why this is such a fan favorite to your refined selves, I will just briefly go over the aforementioned Enigma code for the uncultured few still in the dark.
The T10 was perfect because it was long enough to make an impact in the shot but not so wide that it would give the model third-degree burns every time she breathed in and out.
The other core reason was it is a very good value at £1.45 (or about $1.8) per bulb from China, and as long as you’re prepared to wait a little bit for it to arrive, you won’t find a better deal than that.
The E27 simply refers to it being screw fit, and this is important to remember when purchasing your holders.
40W refers to the fact that it is 40 watts. This isn’t too important, other than that you’ll need to remember that fact if one of these bulbs accidentally and immediately breaks as soon as you remove it from the packet and need to urgently buy another bulb from a closer seller that also sells 60w versions.
Pro Tip: Buy more than seven bulbs on your initial purchase!!!!
3. Bulb Housing – Again, this feels like it’ll be obvious, but once again, there are a million and one options. I went for …. wait for it… the cheapest one I could find.
Again, we’re buying seven of them, so I wanted to keep it cost-effective while still looking somewhat cool. And by cool I mean it didn’t look bright white and plastic…. I got halfway there. Sadly, the sexy-looking metal ones were considerably more expensive, so I decided to leave it and just go for the clean-looking black plastic design. Seven of these cost about £20 (or $25)
4. Cables – I’m sure you’ve worked out a running theme in my choices here, but yes, once again, I tried to do this as cheaply as possible, so cheap in fact that I actually made my life considerably harder in the process. Let me explain. I knew the cables would be hanging in the shot, so I didn’t want some dirty old white plastic cable dangling there, so instead, I went for that cool-looking braided vintage-style cable. Unsparingly this is more expensive than your regular fridges extension cord, so I decided to buy enough ‘fancy’ cable to hang in-shot and then splice it into a cheaper crappy cable for the sections that were out of shot.
I purchased 10m of the vintage-style cable for £21 ($26) and 10m of the flat black flex for ~£7 ($9). Like I said that cheap cable really was a lot cheaper.
5. Cable Joiner – One extra expense in splicing the cables like this was a cable connector. I’d have to splice the two cables on all seven strings, and to do that, I needed a cable connector/joiner. Thankfully, these are very cheap.
I got mine for ~£3 ($4).
6. Plugs – Lastly, I, of course, needed plugs to actually plug all of these hanging bulbs into the wall. I’m sure there is a far better solution than the one that I had. Namely, I just purchased seven plugs for all seven of my hanging bulbs, but I’m sure the more electrically minded among you will know of some way to attach all these stings to fewer plugs.
The one major benefit of making them all separately like this, though, is that you have the ability to split each of the cables up and run them exactly where you want them. As you can see from the BTS above, there was a lot of messy cabling involved to string everything above the model and then back down to the floor and then to the power. So, with that said, I still think I prefer having separate plugs to give me that flexibility when arranging the bulbs, even though there are ultimately a lot of plugs to deal with.
I purchased 10x 13 amp plugs for ~£10 ($12)
Vintage Style Bulbs x7 = £10.75 ($13)
Vintage Style Bulbs (spares) x2 = £3.33 ($4)
Vintage-Style Fabric Cable 10m = £21.34 ($26)
Regular Black Electrical Wire 10m = £6.97 ($9)
Retro Bulb Holders x7 = £19.98 ($25)
Cable Connector Block = £2.85 ($3)
Electrical Tape = £1.95 ($2.5)
TOTAL = £67.17 ($85)
*Pricing as of 2023
These steps aren’t very tricky, but they are fairly time-consuming when you have to do everything seven times. You don’t need any special tools either, and a screwdriver will cover it. That said, I did end up buying a wire stripper after the first couple of strings, as that made stripping the scores of wires far faster.
Connecting the wires
As I’m a cheapskate and decided to buy nice wire for only half the setup, I had to splice the cheap stuff onto the nice stuff. To do this, simply use your wire connector and attach the vintage-style cable on one side and the regular flex on the other side. Just be sure to match the colored wires on both sides. I then recommend wrapping the entire block in black electrical tape so it doesn’t look like a completely lethal fire hazard to the model and team when on set!
Wiring up the Bulb Holder
Again, this is fairly straightforward, and you just have to strip the plastic sleeve off of the cable and attach it to the corresponding screw and then tighten everything back up. Many of these bulb holders will also have a tightening screw on the tip where the cable enters. Once everything is in place, be sure to tighten up that screw, as it will take the weight of the bulb and not your connecting wires inside.
Attaching the Plug
Lastly, we just need to attach the plug. Again, nothing tricky here. It is just time-consuming. Just make sure you’re attaching the right colors to the right pins.
Disclaimer: Just in case it wasn’t abundantly clear, I am not an electrician, and I do not claim to be able to advise you on any of this. You wire all of this together at your own risk.
Suspending the Bulbs
The setup itself is pretty straightforward. After all, I’m sure most of you have shot a portrait with a key and hair light before. The trickiest part for me was getting the bulbs to look good in the framing. I had seven bulbs to think about, and I wanted to showcase depth in the shot, meaning I wanted to have some bulbs close to the camera and some further away. Again, in principle, this is easy, but I also logistically really only had two crossbars to suspend them from, so the depth was managed via two bars crossing each other above the model and placing the bulbs along the length of them in a random way to make it look visually pleasing.
In the images above, you can see that I clamped all seven lights to only two crossbars. I would then place them in position and adjust the height of the bulbs to give them a more random look. This process will be easier if you have several additional crossbars or booms to attach the bulbs to. Regardless, I recommend getting this as close to in place before the talent actually stands there, as this will take some back and forth.
One other aspect that is painfully obvious from the images above is how short the cables ended up being, and you can see extension leads hanging from the stands as a result. This miscalculation happened due to me planning on having this rig closer to the ground. As it turned out, the model was taller and wore heels, and I wanted the option to shoot wider if need be. I didn’t want to see the crossbars above if I did. If you can, maybe consider getting more of the cheap flex cable and making all of your strings longer to give yourself more options.
Choosing the White Balance
The white balance choice in this shot is crucial to the final image, and in my opinion, failing to carefully consider what all of the lights and camera are set to will result in a very different image.
If we quickly recap the white balance settings we had:
Camera: 5000K
Key-Light: 10,000K
Hair-Light: 2000K
Bulbs: 2000K
With the camera set to ~5000K, it makes the key light on the model appear blue due to it being set to 10,000K. That is nicely contrasted by all the other Kelvin colors in the image as the hair light is set to 2000K along with the hanging bulbs, which are naturally 2000K.
It seems complicated, but remember, whenever you’re following any of my lighting setups, I’m never interested in what’s accurate, I’m only interested in what looks good. Here, none of the lights are set to the ‘accurate’ white balance of the camera, and therefore, all of the lighting in this shot is either cool or warm in relation to the camera.
Adding Atmosphere
I don’t recall taking any images where there wasn’t smoke in the room, so I can’t show you what it would look like without it, but I do think adding some form of smoke or haze to this setup makes a huge difference.
I used the handheld SmokeNINJA to add the haze and atmosphere to these images
I used a SmokeNINJA to add the smoke here, as it’s a super-quick handheld smoke machine. Adding some form of atmosphere helps to give those bulbs in a shot that gorgeous warm glow, plus it helps to force separation between the subject and background, too. And by background, I mean the bulbs further away compared to the closer ones, as well as the actual background. The haze forces us to perceive an extra layer of depth when the bulbs further away appear slightly less distinctly than the ones closer to us. This all helps add depth to the shot
Lens Filters
With everything finally in place, we can now afford to get a little creative with how we capture the shots. One of my favorite ways to do that is with lens filters. There is a lot to choose from, but here are some images where I was playing with some of my favorite filters.
Filter Used: Prism FX Dream Filter
This is one of the more subtle filters, but it’s very effective when you have lights either in-shot like I have here or, at the very least, lighting coming back into the lens. If you look closely, you can see a distinctive glow around the bulbs, which is a beautiful effect, albeit simple.
Filter Used: Prism FX Flare FX Filter
This Flare FX filter produces a very dominating effect, and it’s hard to miss. That said, once again, this filter only works when there are points of light in-shot. Without them, you can barely tell it does anything at all. This effect is supposed to replicate the classic anamorphic flares we see in movies. It’s very distinctive, but it should be used sparingly.
Filter Used: Prism FX Chromatic Flare FX Filter
Lastly, I tried a far warmer version of the anamorphic flares from above, and as you can see, it produces a similar effect, just in reddish hues instead of the colder blues. Once again, this only works when there are lights visible in-shot.
Artistic Lenses
As a studio shooter myself, there are limited visible effects when using vintage lenses in my work. Most old or even modern art lenses display their unique traits and qualities at the edges of their frame, and for the most part, the center of the frame is left fairly untouched by their unique looks. This is great if you shoot a lot of work outdoors with tons of data at the edge of the frame, but in the studio, a lot of that look can be lost entirely when there’s nothing but a neutral background at the edges.
With a setup like this hanging bulbs one, however, there’s far more going on at the edges of the frame, and that results in far more of the individual lens properties shining through. Take a look at some of the ones that I played with below.
Click to enlarge – Lens Used: Petzval 58mm f/1.9
It’s tough to think of a more distinctive lens look than the Petzval, as that incredibly swirly bokeh is legendary at this point. This lens is not easy to use, though, and not only is it manual focus, but a manual focus that is adjusted via a form of rack & pinion! On top of that, the aperture is adjusted by dropping in metal discs with holes in them via a slot on the top of the lens. User-friendly, it certainly isn’t, but its distinctive look certainly makes up for it.
Lens Used: Lensbaby Velvet 56mm f/1.6
Lens Used Nikon DC 105mm f/2
Another ‘art lens’ I tried was the Lensbaby Velvet 56 ($449). This is a far more modern lens, and although the effect is less distinctive, a unique look is still very much there. If you’re not sure what you’re looking for, then I’ve included a more traditional image next to it for comparison. The key areas you want to be looking at are how the lens renders edge detail and how it renders points of light. You should see that the Velvet creates those distinctive halos with its bokeh, and of course, all the highlights have a very generous glow to them compared to the cleaner Nikon lens shot next to it.
As I mentioned at the start, this isn’t a particularly tricky setup to get right; it just takes a little more preparation than normal. The only real stumbling block I see many having with this one is the Kelvin shifts and how you may be inclined to go after ‘accurate’ color. I assure you this isn’t the best approach with this setup, and with that in mind, just make sure you’ve selected the manual white balance over auto white balance on your camera.
With this slightly more creative approach to the final image, I’d also urge you to add other elements to the shot, too. For example, don’t be afraid to add smoke, lens filters, and even art lenses to the final look, and do your best to try and get most of this in-camera over trying to add these effects later on in the post. I assure you, it’ll look far better getting it right in-camera first.
Lastly, now that you’ve made your hanging vintage-style bulbs, I’d urge you to test out other bulbs in place of the vintage filament ones. How about colored bulbs, maybe even more abstract-looking bulbs? Give it a try, and let me know how you get on.


