
We need to protect our gear. As professionals and creatives, we need to be very protective of our gear and time. Dust in our cameras and on our lenses can be damaging and eats away at our editing time.
The very act of using adapters that attach to the body of our camera is an act of exposing the delicate sensor to dust and/or damage from the environment. Using an adapter that affixes a digital full-frame or crop-sensor camera to a large format is even more challenging in this regard.
Caution: There are Risks to Consider When Using Adapters!
To take full advantage of the large image circle projected by large format cameras requires that we remove the digital camera, flip it over, and re-attach it. Every time we do that, we are exposing the camera sensor to the elements. I strongly advise caution, particularly when using these adapters outdoors.
Large format still life from a digital full-frame camera
This is where the fun begins. In this first article, I am starting with the simplest use of the Fotodiox 4×5 Graflok adapter. In my case, I am adapting my eMount Sony Camera to a Graflex 4×5 Speed Graphic.
While it requires a series of ten images stitched together to take full advantage of the Graflex’s large image circle, for something as simple as the rose above, only requires two. This is a great way to start using this adapter; start simple and evolve from there.
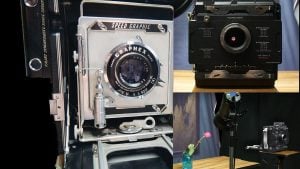
FotoDiox adapter fixed to Speed Graphic
If you are familiar with the Graflok, you know that sliding the rails on top of and below the ground glass/film holder allows you to quickly compose your image on the ground glass, then replace the ground glass with the film holder and take your picture.
Using the ground glass to compose with the Fotodiox Stretch adapter is not practical. Because the adapter sets the camera’s sensor well behind the focal plane of the ground glass, it changes the effective focal length and the viewing angle becomes narrower.
Therefore, to compose our image with the digital camera attached, we need to move and rotate the camera in all positions necessary to visualize our field of view. The composition of the rose image above is so simple it only requires flipping the camera over to compose what will be at the top and bottom of our final image.
Composing the image
Fotodiox adapter locked in center position, right side up camera on top row
Notice in the image above, the adapter is locked into its center position by a thumbscrew (not shown). This is important because when the adapter is flipped over into the second position, we want the alignment to be as close as possible.
From the top row orientation, the lower part of image is composed
Use magnified live view to set focus
If you are new to view cameras, it is important to be aware that the projected image is upside-down. And, just as with our normal lenses, the image seen on the back of the camera will appear properly oriented.
However, what we need to be aware of is that the upside-down projection requires that we compose the bottom part of our image while the camera is mounted in the upper position. Conversely, when we flip the camera over to the bottom row, we’ll be composing the upper part of the image.
Fotodiox adapter locked in center position, upside down, camera on bottom row
Once we have our composition, we return the camera to the first orientation, confirm focus and exposure, then take the picture. The camera and adapter will then be rotated 180 degrees into the second position so we can take our next image.
Two images taken in sequence from the top, then bottom camera orientation.
Combining the images
You have several choices for combining/stitching the images together. For this simple example CaptureOne will be used.
The steps are simple:
Open CaptureOne
Import the images
Highlight/select the two images
Right-click on an image
Select Stitch to Panorama
Select a preferred stitching method. For these two images, there is very little difference between the stitching methods, so select one of the simple methods for a faster outcome. Immediately upon clicking on the Panorama Stitching option, the process will start and quickly render your image. You can select the various options and find the rendering that you like best.
When satisfied with the rendering choice, click on the Stitch button in the lower right corner. CaptureOne Panorama stitching screenCaptureOne will stitch the images together into one large .dng file.
Review, Crop and Edit your image as desired.
There will always be some degree of misalignment due to the process. Therefore, when we are composing, it is important to leave plenty of room for copping.
Of course, CaptureOne is not the only software capable of stitching images together. Photoshop does a fine job, the steps are just a little different. When using Photoshop, the process would be to:
Open a new file
Click on File
Select Automate
Select Photomerge
Click on Browse
Select images to merge
Select the merging option (auto seems to work well)
Click on OK
NOTE: With these two images, Photoshop took three times as long to render, and the merged image had artifacts not seen in the CaptureOne stitching process.
The longer rendering time is probably due to the fact it was managing the Raw files where CaptureOne had already imported the Raw files.
Stitching artefacts introduced by PhotoShop


