
I’ve shared several silver mylar lighting techniques over the years, so I’m sure most of you know many of the tricks to get the best from this very cheap yet remarkable material. But if you’re new here or simply just need a reminder, what is all the fuss about when it comes to this incredibly versatile product?
As I mentioned, silver mylar is pretty cheap, and you can get it from all of the typical online mega-corps, but you won’t find it in the usual photography category. Or if you do, you’ll find it for ten times the price. Silver mylar is used for a variety of things, from food storage, party supplies, helium balloons, and even gardening, but what we’re using it for is a way to create beautiful reflective patterns. If you purchase silver mylar from the gardening section, you’ll find it available in long rolls, as the very pliable and highly reflective surface is exactly what we need to make the effect we’re after.
As I said above, I’ve already shared lighting techniques in the past that use this material, so if you missed them, I’ll share those at the bottom of this article for you to take a look at.
Adding Color
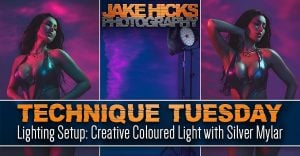
I’m sure it should be no surprise by now, but I do love to add color to as many of my setups as I can, and this week’s article is no different. Firstly, let’s take a look at the sort of shot we’re trying to create.
I’ll share a bunch more examples below, but these initial two shots give you some idea of just how much color we aim to apply and how little white light we’re using.
The Setup
I know many of you like to check the set plan first, so below, I’ll share what’s being used and where…
TL;DR
Set up a white background behind the model
Place a large sheet of silver mylar on the camera’s left
Position model fairly close to the background
Point hard light at silver mylar and set or gel it with a bright pink color
Add a large diffused blue light like a large softbox to the camera’s right and point it toward the model
Place white light to camera-right, up high and slightly behind the model, and angle it down towards them
What You Will Need
3 Lights – As with more and more of my setups these days, I’m pretty much only shooting with LED lighting simply due to them being unbelievably easy and convenient to use. Of course, this setup can comfortably be achieved with flash too, so just translate what you need for the lights you’ll be using.
1 Hard Light Modifier – This is the light that is shone into the silver mylar, and this needs to be very focused. By that, I mean that even though this light is placed on the right-hand side of the set, this light should only hit the mylar on the far left and nothing else. An optical snoot or even a gridded reflector dish will be fine, and I was using the Godox Spotlight on the Godox SZ150R (559$) full RGB LED light to get a very hard and controlled spot of light.
1 Soft Light Modifier – You’ll almost certainly have one of these, and I was using a Rotolight AEOS 2 Pro LED light (1499$) in their R120 softbox. A similarly large softbox or even a big white umbrella will also work.
1 White Light – This light has a little flexibility with what modifier you use, the only stipulation is that none of this white light must either directly hit the background, or inadvertently bounce back into it. I’m simply using a bare Rotolight AEOS 2 Pro, and I’ve flagged any potential light by wrapping the background side in cinefoil (matte black tinfoil).
White Background – Use whatever you like here, but I simply used a white window blind as that was super quick and easy to set up. Alternatively, a white paper backdrop or even a white wall will work equally as well.
Silver Mylar – I’m sure this one was no surprise, but yes, this setup does require a large sheet (usually a roll) of silver mylar. I’m simply suspending it up high with a C-stand and boom arm.
Camera Settings
Camera – Nikon D850
Lens – 105mm f2
Shutter Speed – 1/125th
Aperture – f2
ISO – 200
Kelvin – 5000K
Focal Length – 105mm
The Results…
Click to enlarge any of the shots below.
Featured Model: Basia Panecka
Breaking it Down
Background
I’m using a simple white window blind here as they’re quick and easy to swap out and hang. You can use whatever you like here, though, and a white wall would, of course, be the easiest. The trick to positioning will be how close you have the model to it. We want her close enough to the backdrop so that the reflected mylar casts those beautiful highlights onto the background and her, but we don’t want her so close that she casts heavy shadows from the soft blue light in front of her. The only way to do this is to simply test it and move her closer or further back as required.
Silver Mylar
The star of the show is the silver mylar, and as I mentioned at the top, thankfully, it’s not hard to get, nor is it particularly expensive. I recommend searching for it with ‘gardening’ and ‘roll’ in the phrase, as that gives you the most useful results. I also recommend you get it in as wide of a roll as you can find. Often that’s 1.5m, and then the length is up to you, but likely 10m is going to serve you well for a while. Prices do vary wildly, but a 1.5x10m roll should be around £20-£40.
Hard Light
I used my Godox Spotlight on a Godox SZ15R (559$) full RGB LED light, and that was just for convenience, as I can simply choose whatever color I want without the faff of gels. You can, of course, use an optical snoot here or even a controlled light from a grid, snoot, or possibly even barn doors. The most important aspect here is that the light must be controlled enough to pass across the room without hitting the model and only hit the silver mylar on the opposite side.
Soft Light
Again, we have plenty of options here. I used a large softbox in the form of a 120cm one from Rotolight as that houses my Rotolight AEOS 2 Pro light (1499$). But you can use any large softbox you like. Once again, it was just easy to set my RGB LED to the blue I wanted, as wrestling with colored gels inside softboxes is a real pain. It can be done, but it’s a bit fiddly. If you don’t have an RGB LED light and instead have a strobe or speedlight, then I’d probably suggest a large umbrella, preferably with a white interior to keep the light soft. These are far easier gel than softboxes and are super quick to put up too.
The Silver Mylar Effect
The core look and effect we’re going for with this setup is the dappled lighting effect we have on the background behind the model. In this setup, it’s the bright pink pattern on the wall, and the aspect I particularly love is how varied it can look from shot to shot if you set it up correctly.
As you can see in not only the model shots I shared above, but also in the example background shots below, you can get a different look with each image you take, and here’s how I did it.
The silver mylar dappled effect works because it’s so thin. The sheet gets slight ripples and bumps in it, and it’s these imperfections in the surface that get reflected onto the background. One way to enhance the variances in the effect is by using a fan on the sheet, as that movement from the wind will keep the mylar moving and fluttering, and that, in turn is what gives you the varied effect in each shot.
Points to bear in mind for using mylar
Controlling the Mylar Light
This seems simple enough, but failing to keep the pink hard light off of the model before it hits the silver mylar will result in a terrible look. Firstly, it’ll likely be very overexposed before it bounces off of the mylar, and secondly, it’ll be a very harsh-looking light that will overpower the other lights on her, too. Using an optical snoot or even barn doors to keep it only on the mylar is key.
Controlling the White Light
The other core light to keep very controlled is the white light slightly behind. That white light can only fall onto the model, and the reason it’s slightly back and up high is to stop it from hitting the silver mylar on the opposite side of the room. If it does, then it’ll bounce straight off of that mirror finish and wash out the other colors in the shot. Use a flag to keep control of it from falling onto the background, too. If that white light hits the background, again, the colors will be completely ruined. I used black cine foil, but any flag will do.
Posing
As with so many of my lighting techniques, a synergy between pose and light is key. Sadly, models that I work with rarely have the luxury to dance and move about too much. That certainly makes their job far harder, but their failure to keep in mind where they can stand and look will often result in bad or sometimes unusable shots. In this setup, for example, the model can’t move too far back as they’ll be out of the white light, and they can’t move too far forward as they’ll move into the pink light that is firing in front of them. They also should ideally look to their left to be lit by the light that is ‘up-stage’ behind them. It can work with them looking the other way, and I shared an image above where she looks to her right, but the lighting works best when they look to their left.
Variety
I mentioned this above, but using a fan on the mylar will result in the background effect changing dramatically between each shot. You may not want that, but I found it to be a great way to add variety to each of the shots. Of course, you want to keep it simple, just don’t use the fan.
Photography and lighting techniques using mylar
About the author
Jake Hicks is an editorial and fashion photographer who specializes in keeping the skill in the camera, not just on the screen. For more of his work and tutorials, check out his website. Don’t forget to like his Facebook page and follow him on Instagram, too. On Jake’s Facebook page, you can also tune in for a live stream every other Tuesday night. You can also sign up for the Jake Hicks Photography newsletter to receive Jake’s free Top Ten Studio Lighting Tips and Techniques PDF, and be sure to download his free 50-page studio lighting book. This article was also published here and shared with permission.


