
The goal of a beauty portrait is to highlight the subject’s physical beauty. The challenge in adding the word ‘creative’ to the mix is that you don’t want the photo to become more about the photographer’s creativity than the subject’s beauty.
The Concept
The subject of this beauty portrait shoot is my makeup artist, Monae. She sent me a selfie showing she had long, straight extensions in her hair. By day, Monae is a hair stylist with her own salon.
She knew I had been looking for an opportunity to create some shots with long hair; however, on short notice, I did not have time to acquire accessories or costume pieces to style the shot. Not one to pass on a good opportunity, I decided to go for a creative version of a beauty portrait. No fancy accessories or fu-fu – just beautiful and creative lighting and poses.
I decided to steal from a shot that I created eleven years ago. You can see in this shot to the right the subject is looking straight at the camera, with her blonde hair in a ponytail on the very top of her head.
My makeup artist, at the time, was just out of frame holding the hair and releasing it on a 3-count.
The two images below were created in just under two hours. It was a rare instance of having a spur-of-the-moment idea and being able to get into the studio and execute it well.
The image was created in 2012 with a Nikon D800 and Nikkor 70-200mm f/2.8 lens.
Pro Tip: The term “beauty lighting” is often used interchangeably with “glamour lighting,” but there is a subtle distinction between the two. Beauty lighting is typically softer and more diffused than glamour lighting and less likely to create high-contrast shadows. Beauty lighting aims to create a natural, flattering look that enhances the subject’s natural beauty.
The Beauty Portrait Set-Up
I initially planned to shoot straight-on as I had done in the earlier shot from 2012, and my original thinking was to shoot on a black background and then add lots of colors (Orange, Blue, Yellow, and Magenta).
I placed the camera just below my subject’s eye level and planned to add some smoke to the background via an overlay in post-production.
I was standing on a small step stool just out of the frame and dropping the model’s hair while firing the camera with a wireless remote control.
I was tethered using a 15-foot Tether Tools TetherPro USB-C to USB-C cable that I could see from my perch on the step ladder.
The smokey haze and dark circular vignette were added to the image in post-production.
Click the white play button below to see the behind-the-scenes of how I shaped the hair.
Lighting Diagrams
You can see in the lighting diagram for these creative beauty portraits below that I used 6 Godox AD200’s ($299) for the first shot from this session. (The square image above).
My key light, one Godox AD200, is mounted with the bare-bulb head in a Phottix Rani II 33in Folding Beauty Dish ($145). The key light was mounted on a Neewer Stainless Steel Heavy Duty C-Stand ($275), 5-10 feet (1.5m-3m) with 4 Feet (1.2m) Extension Boom Arm.
The remaining five lights had the fresnel heads in place and were gelled with MagMod-colored gels ($49). Two lights were set as rim lights with yellow gels to create the yellow edge highlights on my subject, and the Orange, Blue, and Magenta gelled strobes were aimed at the Savage Universal Black #20 Seamless Paper Background.
Four of the remaining lights were mounted on Cheetah Stand C8 Automatic Light Stands, while the background light with the blue gel was mounted on a DIY background stand made from a Baby Pin Wall Plate.
Lighting Diagram for the 6-light version of this creative beauty portrait. The white circle represents a ten ′ diameter circle.
📸 Pro Tip: While you are new to working with this many colors and lights. Begin your set-up with your background lights – one light – one color at a time. Take a test shot after placing each light to confirm that you have the light set to the proper power and at the correct angle to achieve the desired look. Once you have done this with the background and rim lights/colors, turn on your key light and adjust the power to make your subject stand out.
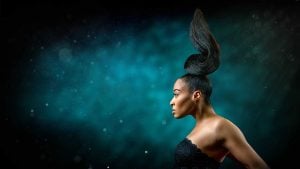
While I was pleased with the look of the first shot, it felt too predictable based on my style and previous images. When I began to “work the shot,” looking for variations, my subject suggested a profile shot.
While I am not a fan of profile portraits, I knew I could work outside the box because this was a creative beauty portrait. For the final shot, I had my subject lean backward and rest her hands on another chair. Then I had her push her chin forward as far as she could and tip it down.
To ensure I had as much impact as possible from the eyes, considering it is a profile, I put an adhesive dot on the wall opposite my subject to give her a spot to look at. Even from the side, the eyes need to be well-balanced.
Not to mention that the dot gives my subject a spot to focus on, which means she is much less likely to turn her head even slightly from side to side, giving me one less thing to worry about while I am shooting.
Also, when I switched to the profile view, I was able to cut back to just three lights, as you can see in the diagram below. I used a teal gel for the background and a yellow light on the camera right for a slight accent.
Note: The shape of the teal background light is created by using the fresnel head on the Godox AD200 and placing it close to the background so that the natural spread of light creates the cone shape.
📸 Pro Tip: Don’t forget the Catchlights: In beauty portraits, their size and position can be crucial. Large, central catchlights evoke a wide-eyed, innocent look, while smaller, off-center ones create a more mysterious, contemplative vibe. To learn more, read this article: The Importance of Catchlights for Portraits.
The Camera Gear
The camera was a Sony A7IV ($2499) Camera Body with the Tamron 70-180mm F/2.8 Di III VXD ($1199) set at 100mm for both shots. The camera was mounted on an Acratech GP-SS Ballhead ($479), which was mounted on a Cheetah Stand Pistol Stand with Extra Grip & Castors.
My choice for the one image to represent this shoot. While I am happy with the square image above, this version represents something different in my body of work, and as a result, it will stand out more.
The Final Frame
The final image required minimal retouching because I was working with an excellent makeup artist as my subject. I encourage you to always work with a makeup artist.
In post-production for the first (square) image, I added a light smokey overlay to the background, and in the horizontal image with my subject turned profile to the camera, I added a cloudy texture with some soft haze and Bokeh.
In the case of this shoot, it was a matter of experimenting with two different lighting arrangements, two different poses, and many different ways to twist the hair and flip it.
Have more questions about beauty portraits or lighting? Would you like to continue the conversation? Join my TOGKnowledge Photographic Community, where you will find photographers from over 30 countries passionate about learning and sharing their photography as they develop their craft.
I hope you found this information useful. Now go pick up that camera and shoot something! Because – “Your BEST shot is your NEXT shot!” — Joe Edelman


