
It’s ironic that the first instant camera invented by Polaroid Corporation over 70 years ago could, today, become a 4×5 large format camera powered by FujiFilm Instax instant film.
This unusual juxtaposition then begs the question: would you like to dip your big toe into the large format photography ocean, but you don’t want to spend an arm and a leg?
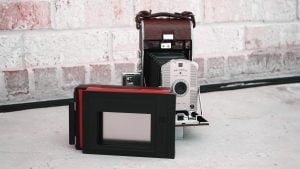
This simple, non-destructive project will give you jaw-dropping depth-of-field (for a FujiFilm Instax camera) for less than $200 – including film (see Figure 1).
Figure 1. Combining something old with something new gives you something to create large-format photographs.
Your shopping list for building this fantastic first foray into four-by-five fun begins with purchasing the Lomography LomoGraflok 4×5 Instant Back ($174.90). This popular product enables you to experience all of that large format goodness without fumbling around with clumsy film holders or waiting weeks for developing and processing your negatives into prints.
Just pop a FujiFilm Instax Wide film pack into the LomoGraflok and you’re almost ready to start printing instant 4×5 prints. You can expect to pay from $10 to $14 for a 10-print pack of Instax Wide film. The color film comes in a two-pack (i.e., two 10-print packs) for $19. While a monochrome 10-print single pack costs $14.
We’re just about there and we’ve already built just over 50% of a 4×5 camera for around $190. That final 49%, however, is the really sweet part of this project. Why? Well, first of all, the cost of this final piece is around $10 in “good” condition on today’s used Polaroid camera market. We don’t need either a “mint-like new” or an “excellent” used camera. A “good” to “very good” model will work just fine.
The second element that makes this vintage Polaroid camera so sweet for this project is that its specs are awesome for any 4×5 camera: a gorgeous pop-up viewfinder with a flexible finder “gunsight” post, a reasonably sharp lens, simple focusing system, a quirky, but accurate exposure interface, a built-in cable release socket, and, finally, best of all, it has a built-in tripod. Yes, this Polaroid camera was truly a marvel of the photography world (see Figure 2).
Figure 2. The Polaroid Model 95.
Finally, this “sweet” used Polaroid camera offers you one last feature for generating breathless excitement; it easily lends itself to a simple, non-destructive modification procedure that’ll have you savoring large-format photography in less than 15 minutes.
This camera is the Polaroid Model 95. This is the baby that started the whole instant photography craze in 1948. Even with that ancient heritage, you shouldn’t have any trouble finding one. According to “Polaroid Cameras Current Pricing Guide, 1948 – 1970” by Ladd Publications, Inc., 1979, the Polaroid Corporation produced 950,000 copies of the Model 95. This figure was only exceeded by the twin Japanese models made for worldwide markets, Model 120 with 1,000,000 copies and Model 160 with 2,400,000 copies. In fact, there are lots of roll film Polaroid models that could be substituted for the Model 95. Try looking for Models 95A, 95B, and 700. In a pinch, Models 150, 800, and 900 could work, too.
When you’ve acquired the LomoGraflok, Instax film, and a Model 95, it’s time to perform the 3-step 4×5 camera modification:
Step 1. Remove the two roll film holding backs’, the outer back and the inner back, hinge pins. These pins simply push out of the hinge fingers. A slender scratch awl and a pair of strong pliers will be needed for yanking these pins out of each hinge. Refer to Figure 3.
Figure 3. Pull out the two hinge pins to remove the roll film backs from the Model 95.
Step 2. The raised hinge fingers of the inner back are an obstacle for attaching the LomoGraflok. Therefore, both the LomoGraflok focusing spacer and the Instax film back must be joined together to avoid this blockage. This technique will ensure that a flush fit can be made between the camera and the new film back. Use a strong, light-resistant tape around all four sides of this LomoGraflok “sandwich” for holding these two parts tightly together. Use Figure 4 as a helpful guide.
Figure 4. Tape the Lomography LomoGraflok back and spacer together. Note: red electrician’s tape was used for more clearly showing this step.
Step 3. Attach the joined LomoGraflok pieces from Step 2 to the open back of the Model 95 from Step 1 with two (or more) long, heavy-duty elastic bands. As a reference guide, a properly aligned LomoGraflok should rest securely against the base of the Model 95 viewfinder.
Your 4×5 camera is now ready for use. Insert four AA batteries into the LomoGraflok and plop a fresh film cassette into the Instax film back. Before you start snapping shots, however, here are three points to help you maximize your large format potential:
Due to the outwardly moved film plane of the joined LomoGraflok spacer and Instax film back, the Model 95 focusing scale is inaccurate. Instead, release the front lens standard lock and slide the entire lens/shutter/aperture assembly backwards (just like you’re going to close the camera) until the front lens’ standard roller is directly opposite the 8-foot mark on the focusing scale (see Figure 5). The focus is now fixed. Everything from about 5 feet to infinity will be in pretty good focus. Just don’t expect/demand a tack-sharp focus.
Figure 5. Slide the front lens standard back until the support roller is near the 8-foot focusing scale mark.
The Model 95 doesn’t use a conventional exposure system. Rather, both the shutter speed and aperture are joined together. A knurled wheel on the top of the front lens standard is rotated for setting exposure numbers for coupling both the shutter speed and the aperture together. These values range from 1 to 7 (or, 8 on Models 95A and 700). A setting of 5 or 6 is a good starting point for exposing Instax film. Interestingly enough, this same system on the Model 95B switched to Exposure Values (EV) with a range from 10 to 17. These EVs corresponded with the same EV system used on handheld light meters. That was brilliant, Polaroid.
During normal photographic operation of this 4×5 camera, your exposure ritual will consist of the following actions: frame your subject, adjust your exposure number, remove the dark slide, click the shutter release, insert the dark slide, and then eject the exposed Instax print. Now rinse and repeat for the remaining nine prints inside your Instax film pack.
Here is a small sampling of the photographic potential that can be realized with this Polaroid Model 95 4×5 Instax camera:
Figure 6. The Model 95 originally used black and white instant roll film with a lovely deckled edge.
Figure 7. Expect a slight color shift with the non-multi-coated lens.
Figure 8. Monochrome Instax film is ideal for this DIY 4×5 system.
Figure 9. Close-up details are still possible with the fixed focus.
Figure 10. Incredible depth-of-field is possible with this camera.
Figure 11. Subtle tonal gradations render a glowing beauty in monochrome Instax images.
While this camera is great for handheld use especially when using the built-in leather hand strap, there is a unique feature that can enlarge your enjoyment, as well as produce excellent photographic results. Below the camera’s front opening latch is a silver rectangular tab that can be extended for creating a built-in tripod support. Pop this tripod tab out and place the camera vertically on a level surface (see Figure 12). You are now ready to jump into the large-format photography world with both feet.
Figure 12. A built-in tripod leg (plus two conventional tripod sockets) gives this DIY Model 95 4×5 camera a lot of flexibility/versatility.
Enjoy.


